Map Madness
By Jason Long
For many people, reading a lake map can be simply maddening. For others, it is therapeutic. Fortunately, I fall into the latter group and have learned to utilize my quirky passion for maps to become a more effective musky fisherman. Whether you have a love for reading maps and studying landscapes or simply struggle to interpret the maze of contour lines, there are several techniques that can improve your map reading prowess and help transform the primitive hieroglyphics into a simple musky message.
I’m not sure how many hunters utilize topographic maps, but I do know that most astute hunters have a knack for reading the landscape. Scanning the horizon from a vantage point provides a three-dimensional assessment of where your quarry lives and travels. It is easy to see the contours and edges as they form hills and valleys. Highlands and lowlands are easy to detect by the differences in canopy height from the low laying grass and brush to tall hardwood trees. In one quick glance a hunter can fairly accurately predict deer bedding areas, feeding areas, and the travel routes used between those locations. For comparison sake, musky fishing is like hunting whitetails in unfamiliar terrain with a heavy fog hiding the landscape. And remember, muskies don’t leave tracks!
For musky fishermen, learning the landscape of their quarry’s homeland is not as easy since viewing the terrain is impossible because it is concealed behind a wall of water. However, if you could temporarily drain your favorite honey hole and view the landscape without the obstruction of water, you would easily be able to identify key musky structures and travel routes. Since this is not a feasible option, the next best solution is to learn to translate a 2-dimensional map to the three dimensional landscapes we are most familiar with.
In my opinion, a hydrographic map is similar to standing on a hilltop and viewing the valley you intend to hunt. It is like pulling up to the boat ramp and having the lake empty of water for you to study prior to launching your boat. What an asset.
HIGHLIGHTS
Hopefully I’ve convinced you that a map is a powerful tool that musky fishermen should never be without. Here are some tricks to help you more efficiently read and interpret your hydrographic lake maps.
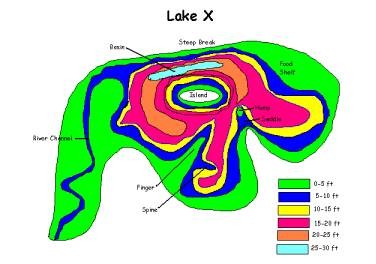
First, make a photocopy of your lake map. Next, get yourself a package of highlighters with at least 6 different colors. Highlight each depth zone in a different color. Depending on the lake’s size and depth, the contour lines may have different increments. For all practical purposes, only highlight between two lines with a single color. On most of my maps for lakes in Wisconsin, the depth lines are in five-foot increments. A “depth zone” is the area between each contour line. Lastly, laminate the map to preserve its integrity and keep it right in your boat.
The highlighting process serves two purposes. First, it forces you to meticulously follow each and every contour line around the entire lake. This should bring to your attention any subtle structures that may go unnoticed at a glance. Secondly, it produces a map that is easy to read and enhances the visual signs that indicate good fishing locations. Food shelves, mid-lake reefs, steep breaklines, main-lake basins, second-tier structures, etc. all jump out at you for easy identification both on and off the water.
WHAT TO LOOK FOR
Now that you have highlighted your lake map, it is time to begin identifying target areas. The first thing to reference is if the lake map has secci disk data. If so, you can now quickly identify the littoral zone. The littoral zone is the area where sunlight penetrates all the way to the lake bottom and allows aquatic plants to grow. The littoral zone is often 2 or 3 times the secci disk reading. This means you can locate the approximate depth of the weedline in a lake without ever launching your boat! Find the depth zone that correlates to your calculated weedline depth and you know what colored areas to look for on your map.
Food shelves are often very easy to locate and definitely a structure that consistently holds muskies in any type of water. Simply look for large areas of a single color on your highlighted map. Some of the best food shelves will be highlighted with a color that identifies a depth zone that is within the littoral zone. Food shelves adjacent to main-lake basins or that have a good breakline along one face are often most productive. The main-lake basin will often be the area in white if it was deep enough to exceed the number of different colored highlighters you used to color the map. If you had 6 different highlighters and the contour lines are in 5-foot increments, the white areas or potential main-lake basins will be anything with depths greater than 30 feet deep. An area where the contour lines are so close together that you can hardly discern the different colors used to highlight each depth zone identifies a steep breakline.
River channels are often easy to identify as well. Otherwise featureless flats can often reveal current areas, inside turns, subtle breaklines, etc. by the contrasting colors effectively showing where the river channel snakes through the expansive flat area. Areas where the river channel meets the shoreline or other vertical structures such a s a stump field can be dynamite spots that most anglers drive right by. Your highlighted map will identify these to ensure you do not make that costly mistake.
Mid-lake humps or reefs are also easy to identify. However, the advantage of highlighting is it will ensure you do not overlook secondary structures such as spines or deeper shelves on the perimeter of the traditional hotspot. These could be the spot-on-the-spot you have been looking for. This same strategy can also be used to eliminate miles and miles of shoreline by revealing subtle features for you to target.
Another frequently overlooked structure is the small basin. Consistently locating suspended fish is often very challenging. However, identifying smaller basin areas within the lake can often confine fish in a more predictable area. Elongated basins can also be an advantage. Long, narrow basins keep you close to structure at all times and make it easier to return to marked muskies or baitfish in comparison to a large, round basin. The highlighting technique will allow you to quickly and easily locate these basin areas.
Personally, I have found the highlighting technique to be most valuable when looking for second tier structures. You will be amazed at how many saddles, points, spines, shelves, inside turns, and deeper travel routes you overlook due to their deeper location. The highlighting technique makes these more concealed contours much easier to locate. For example, let’s say your favorite lake traditionally sets up a thermocline at 18 feet for most of the warm water period. Now view your highlighted map and consider that depth zone no different than the lake bottom itself or as a primary travel zone. I guarantee you will find an area that consistently holds fish that you and many other fishermen have overlooked. In fact, with the fluorescent colored highlighters available today those structures will be painfully visible.
Over time, you will no longer require the need for highlighting your maps in order to locate and identify key musky holding areas. However, it is still a good exercise for accelerating your learning curve when preparing to fish a new lake. Secondly, it is a priceless technique for finding deeper, second-tier structures on lakes you feel you already know well. It could make the difference between just another fishing trip and the trip of a lifetime. Spend intimate time with your maps, employ the highlighting technique, and learn to view your two-dimensional maps as a three-dimensional landscape and the value of your maps will multiply exponentially.